If you do not use an external warehouse management system you can do your stocktaking in Sitoo, either manually directly in Backoffice, trough import of Excel in Backoffice or directly in the Sitoo POS app. In this article we will review how to conduct stocktaking with excel.
Content
Good to know!
- A stocktaking is intended to determine the value of your inventory. Inventory value = number of goods x purchase price of the goods.
- A stocktaking cannot increase the inventory value, only confirm that the inventory balance is correct or not.
- To avoid the misstake of several people counting the same set of products, we recommend that you divide the store/warehouse into sections; one person is responsible for counting one section and submitting that list.
- It is possible to conduct a stocktaking at the same time as sales are taking place in the store, but keep in mind that this creates diffs which then will need to be checked. Read more about this below.
Download a warehouse file
- Log in to Backoffice > Warehouse.
- If you have access to several warehouses you will first need to pick which one to stocktake. There is a blue text in the upper right corner, click the text to switch warehouse.
- Choose your warehouse in the dropdown meny > OK.
Note!The warehouse that is set as your main warehouse is set per defualt if you have not actively selected another layer.
- Double check the selected warehouse. At the top left you see the current stock.
- Press Stocktaking in the lower right corner.

- If you need to count the entire warehouse, please leave all rows and filters untouched.
- Select file format for export. Both of them work, but we recommend CSV file (* .csv).
- Tap Export.
Clear the excel file
- The warehouse file is now downloaded to your computer. Often it will end up under downloaded files or similar folder on your computer.
- Open the file.
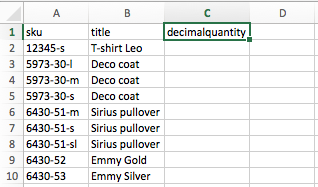
- Look at the excel file: In each row there is a product variant. Each column contains specific information about each product.
- Delete unnecessary columns: Keep columns E and G. Select the columns you want to delete, right click and select Delete.
Column E contains sku, which stands for article number. The product sku is unique for each product and is the single thing identifying the product in the system.
Column G contains title, which stands for product name. This is important to keep in order to more easily know what product you submit.
- Once you have the columns sku and title, add another column.
- Place the mouse at column C and enter "decimalquantity". Use only lowercase letters.
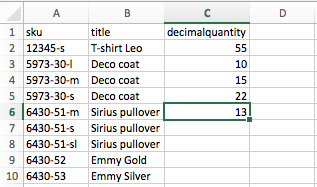
Start counting
- Count one product at a time.
- Enter the amount of products that you have on each row in the column decimalquantity.
- Save the file when you've counted the products.
Import the file
- Delete the title column from your Excel sheet
- Select the rows and columns containing data.
- Right click on the the selected arean > Copy.
Note!Remember to delete the Title column before importing!
- Log in to Backoffice > Warehouse.
- If you have access to more than one warehouse, you must select which warehouse you want to submit. You see a blue text in the upper right in the warehouse view > tap the text to change warehouse.
- Select the correct warehouse in the drop-down menu > OK.
Note!The warehouse that is set as your main warehouse is what you see here if you have not actively selected another warehouse.
- Tap Import in the lower right corner > OK.
- Double check selected warehouse. In the top left, you will see the current warehouse.
- Tap Import.
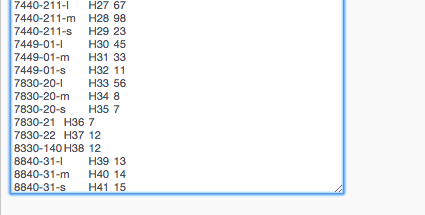
- Right click in the white textbox.
- Paste the information that you previously copied from your excel file.
Note!It is important that the cursor is just behind the last character. Remove any spaces.
- Tap continue > Import > OK.
- Now you have completed the import. Follow the steps below to complete the delivery.
Pause the stocktaking
You can pause your delivery session to do something else in Backoffice and return later.
- Tap Back in the lower right corner.
- The delivery session will be paused.
- Resume the session by returning till the warehouse view in Backoffice and press the blue button in the lower right corner > Resume.
- You will the re-enter the the session and continue the delivery.

Double check the counting
Ensure that all products to be included in the inventory are counted. Then check the inventory.
Check negative diffs
- Log in to Backoffice > Stock > Ongoing Stocktaking.
- Amongst the filtering options, click All status > Diff.
- First check the Negative Diffs.
This status means that the amount counted is less than the amount that the system expected before the stocktaking began. If the stocktaking is completed with a negative diff the stock will be reduced and the stock value will also decrease.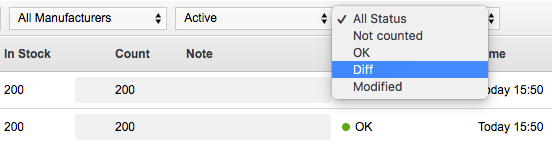
Check modified products
- Log in to Backoffice > Stock > Ongoing Stocktaking.
- Amongst the filtering options, click All Status > Modified.
Then check the Modified products. This status indicate that there have been changes in the inventory during the time of the stocktaking; often because of sales of products that have already been counted, and then sold. Example:
- You initiate the stocktaking at 12:00.- You count Product X to the number of 10 and submit the list at 12.30.
- 1 pc of Product X is sold at 13:00.
- Now the product has been modified.
- You log in to the Backoffice to check the inventory > All status > Modified.
- Product X will still have 10 counted products.
- Product X will also have the status Modified.
When this happens you will need to recount this product. If you want to avoid modified products, the inventory is recommended to be conducted outside of opening hours.
Check positive diffs
- Log in to Backoffice > Stock > Ongoing Stocktaking.
- Amongst the filtering options, click All status > Diff.
- Now check the Positive Diffs.
This status means that the amount counted is greater than the amount that the system expected before stocktaking began. If the stocktaking is completed with a Positive diff the amount of products will be increased but the stock value will not be increased (products will be delivered in with a value of 0). You must therefore handle the excess number by a delivery in.
Why? Your stock value is based upon the purchase price of the products multiplied with the number of products. A stocktaking determines how many products you have in your stock, but it cannot increase your stock value, only lower it.Example
Expected amount: 10 pcs
Counted: 15 pcs
In this example, the 5 products that exceeds the expected amount should be delivered in before finishing the stocktaking. If you were to finish the stocktaking without performing a delivery in on these products they will increase in stock amount but not stock value.
Expected amount: 10 pcs
Counted amount: 15 pcs
Delivery in: 5 pcs
New expected amount: 15 pcsProcedure for correction by delivery in
Example: Product X is counted to 10 pcs, with Diff +2.So there are 2 pcs more than expected.
Exit the stocktaking mode > Press 'Back'. The stocktaking session will remain.
Start a delivery in > Press 'Delivery in'.
Look for Product X with the positive diff.
Make a delivery in of 2 psc > Press 'Save'.
Return to the stocktaking mode > Press 'Current stocktaking'.
Check uncounted products
- Log in to Backoffice > Stock > Ongoing Stocktaking.
- Amongst the filtering options, click All status > Not counted.
- Lastly, check Not counted.
This status notes products that haven't been counted. If the stocktaking should cover all products in your system it is wise to check this section to ensure you haven't missed any during your stocktaking.
Complete the stocktaking
When you have counted all your products and inspected their different status as described above you will be ready to finish the stocktaking.
- If you want to you can export an stocktaking list as is just before you complete the stocktaking. In that case, press Export at the bottom right corner.
- To complete the stocktaking, click the blue Finish Stocktaking-button in the bottom right corner.

- If you wish, you can leave a comment.
- Click the checkbox to approve the stocktaking.
- Click OK to save and complete the stocktaking.
Note!If you click Cancel you will return to the active stocktaking. If you click Finish without saving the stocktaking session will be cancelled and any work performed in the stocktaking will be lost.